
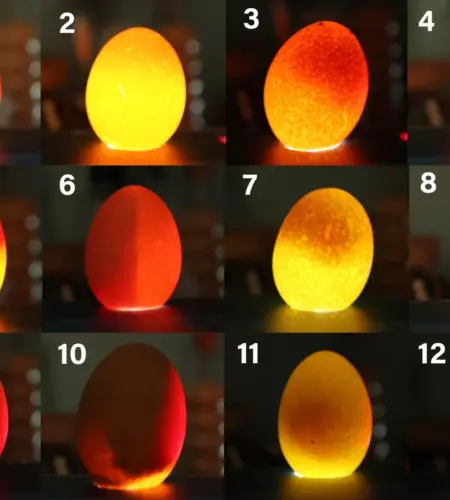
Have you ever wanted to check the health of eggs during incubation without cracking them open? Well, egg candling is your answer. This guide will teach you the basics of how to candle eggs.
We’ll go through what you need, when to do it, and how to read the results. Let’s dive into the fascinating egg candling and see what it’s all about!
What is Egg Candling?

Egg candling is a method used to observe the development and health of an embryo inside an egg. This technique has been around for hundreds of years and was traditionally done with a candle, hence the name.
However, these days, brighter and safer light sources are used. The purpose of candling is to check if the egg is fertile and how the embryo is growing.
When to Candle Eggs During Incubation
The best times to candle your eggs are at specific points in the incubation process. Generally, you should first check around 7 to 10 days after you start incubating them.
This timing is important because it helps you identify which eggs are developing properly and which aren’t, without disturbing the process too much.
Necessary Tools for Candling Eggs
When you start candling eggs, you don’t need much. Here’s a simple list of what you should have:
- Candling Lamp: Choose a small flashlight with a bright LED light. This will help you see the insides of the eggs clearly.
- Dark Room: Find a space where no light can sneak in. This makes it easier to see the details inside each egg when you use the lamp.
These tools are super easy to find and use. With them, you can start checking on the health of your eggs in no time.
This is really all you need to get a good look at how your eggs are doing inside. Make sure to handle everything gently and take your time while learning how to candle eggs.
Step-by-Step Guide to Candling Eggs
Candling eggs is a key step in managing the health of your incubated eggs. Here’s how you can do it effectively:
- Get Ready: First, make sure you have your candling lamp and that the room is dark. This setup helps you see the details inside each egg better.
- Handle with Care: Pick up an egg gently. You need to be careful to avoid shaking or squeezing it because this could harm the embryo inside.
- Start Candling: Hold the egg near the light of the candling lamp. Make sure the room is as dark as possible to see clearly. The light should not touch the egg but be close enough to illuminate its contents.
- Observe: Look for signs of development. In a fertile and healthy egg, you’ll see a network of blood vessels or a dark spot that’s the developing chick. Turn the egg slowly to view all sides.
- Check Development Stages: At different days during the incubation, you’ll see different things:
- Day 7-10: You should see clear veins if the egg is fertile.
- Day 14: The embryo will be bigger, and you might see movement.
- Day 18: The space in the egg will be filled out more as the chick prepares to hatch.
Finally Record Your Findings: Keep notes on what you see in each egg. This record helps you track development and identify any problems early.
When candling, look out for these signs:
- Healthy Eggs: Clear blood vessels and growth appropriate to the incubation day.
- Unhealthy Eggs: Cloudy or clear with no veins, which might mean the egg is not fertile or the embryo didn’t develop.
Understanding What You See
It might take a bit to get the hang of what you’re looking at. Here are some tips:
- If it’s your first time, compare eggs often. Seeing several eggs can help you understand the differences between healthy and unhealthy development.
- Use a reference guide or images from a trusted source online to match what you see with the expected stages of development.
By following these steps, you can become skilled at using egg candling to monitor and improve the health of your eggs. This method isn’t just about shining a light on an egg; it’s about ensuring your future chicks are healthy and ready to hatch.
Remember, practice makes perfect, and the more you candle, the better you’ll understand the life developing inside each egg.
Understanding Egg Candling Results
Egg candling can show you a lot about an egg’s health and stage of development. Here’s what you might see when you look inside:
- Clear Eggs: If the egg appears mostly clear with a small shadow at one end, it’s likely not fertilized. This means there’s no chick growing inside. It’s common to find a few of these in any batch, especially if you’re just starting with incubation.
- Veiny Appearance: A healthy, developing egg will show a network of blood vessels that might look like a red spider web. These veins signify that the embryo is alive and growing. Around day 7 to 10, these should be clearly visible.
- Dark Spots and Movement: As the chick develops, you might see a dark area that grows larger over the days. This is the chick itself. By around day 14, you might even see some movement!
- Solid Dark Areas or Rings: If you see a ring-shaped dark area, this could indicate that the embryo started to develop but then stopped, which is often referred to as a blood ring. This usually means the embryo has died.
Here are a few tips for interpreting what you see:
- Use Good Lighting: Make sure your candling lamp is bright enough to illuminate the egg’s contents without overheating it.
- Keep Comparing: If you’re new to this, keep a healthy egg as a reference to compare other eggs to it.
- Take Notes: Keeping track of what you see in each egg can help you spot patterns and issues across different batches.
Troubleshooting Common Egg Candling Problems
Sometimes, candling doesn’t go as planned. Here’s what you can do if you’re having trouble:
- Adjust the Brightness: If you can’t see inside the egg well, try adjusting the brightness of your candling lamp. Some lamps allow for brightness adjustments, which can help you get a better view without risking damage to the egg.
- Ensure Darkness: The room needs to be completely dark to get the best view. Even small amounts of light can make it hard to see what’s inside the eggs.
- Seek Advice: If you see something unusual and aren’t sure what it means, don’t hesitate to ask for help. Experienced breeders or online forums can offer insights based on their experiences.
Safety Tips for Candling Eggs
To make sure both you and the eggs stay safe during candling, keep these tips in mind:
- Gentle Handling: Always pick up and hold the egg gently. Rough handling can damage the developing chick.
- Limit Candling Time: Keep the candling sessions short. Long exposure to light and heat from the lamp can harm the embryo.
- Return to Incubator Quickly: After you check an egg, put it back in the incubator as soon as possible to keep the development process on track.
By following these practices, you can help ensure a successful hatch and keep the developing chicks safe.
Conclusion
Egg candling is a helpful and exciting way to check on the health and development of eggs in an incubator. Remember to handle each egg with care and use the right tools for candling. With a bit of practice, you’ll get better at spotting the signs of healthy development, which can increase your success in hatching.
Read More: How to Water Glass Eggs for Stunning Decor
FAQs
For beginners, an LED flashlight is the top choice as an egg candler. It’s bright, user-friendly, and safe. This type of light provides excellent visibility without too much heat, making it ideal for those just starting out with egg candling.
To see if an egg is fertile, look for a clear spider web pattern of veins when you use a candling lamp. These veins show that the embryo is starting to grow. If you see these, it means the egg is fertile and developing.
You should first candle chicken eggs between day 7 and day 10 of incubation. This early check helps you spot any developing embryos and remove any eggs that aren’t showing signs of life.
Absolutely, candling can boost your hatch rates by letting you remove eggs that aren’t developing. This way, you can focus on keeping the environment ideal for the eggs that have the best chance of hatching.
Yes, you can candle eggs more than once, but it’s important to do it carefully. Frequent handling and exposure to bright light can stress the embryos, so keep it to a minimum and be gentle.
A blood ring in an egg during candling signals that the embryo began to develop but then stopped and died. It looks like a dark circle inside the egg and is a sign to remove this egg from the incubator.
Candling dark-shelled eggs effectively requires a very bright light source. Make sure you’re in a completely dark room to enhance visibility, as dark shells are tougher to see through than lighter ones.
If you skip candling, you might keep non-viable eggs in the incubator, wasting energy and space. This can also reduce the overall health and viability of the hatch since the environment won’t be optimized just for the healthy eggs.
Candling usually takes just a few seconds per egg, although eggs with thicker, darker shells might take a bit longer to check thoroughly.
Yes, through candling, you can spot signs of healthy development in the chick. This process allows you to check on the chick’s growth and spot any potential issues early on.